How to Unclog Drain Hose on Dishwasher
Learn step-by-step how to unclog a dishwasher drain hose safely, troubleshoot common clogs, and prevent future backups with tips from Unclog Drain.

You will learn how to safely unclog your dishwasher drain hose by locating the hose, disconnecting it, removing any blockages, and flushing it with water. This quick process restores proper drainage, minimizes backups, and protects your dishwasher from overflows. Follow the step-by-step instructions for best results. No special tools beyond common kitchen pliers and a bucket are needed.
Why the dishwasher drain hose gets clogged
Dishwashers move used washing water from the tub through a drain hose to your home's plumbing. Over time, particles from dishes accumulate inside the hose or at the elbows where the hose bends. In hard-water areas, mineral deposits can also build up inside thin hoses, creating a partial blockage that reduces flow. A clogged hose can cause water to back up into the dishwasher or, worse, leak onto the floor. In many cases, the blockage is not in the disposal or sink trap but within the hose itself, close to the connection under the sink or behind the appliance.
Common culprits include: bits of stubborn food like rice, pasta, and vegetables; fibrous debris such as celery strings; grease from greasy dishes; and sticky starches that thicken as they cool. Another frequent issue is a kink or pinch in the hose where it runs along the underside of the countertop or the cabinet. A squeeze of detergent flow can push food matter deeper into the hose, compounding the clog. Finally, if the drain connection at the sink or garbage disposal is blocked, water will back up through the dishwasher hose even if the hose itself is clear, so always inspect the entire drain path.
According to Unclog Drain, most dishwasher drain hose clogs begin with a small obstruction that gradually grows as the dishwasher drains and refills. Early signs include slower draining, tiny pools of water in the bottom of the tub after a cycle, and occasional gurgling or backflow sound. If you notice these symptoms, it's wise to check the hose first before testing other components like the sink trap or the disposal connection. A proactive approach can prevent bigger problems and avoid costly service calls.
Safety and preparation before you begin
Safety first sets the tone for a successful unclogging. Before you touch any part of the dishwasher, unplug the unit from power or switch off the dedicated circuit at the breaker. If you can, turn off the water supply to reduce the chance of a spill or accidental discharge. Remove dishes from the dishwasher and run a short empty cycle to observe the drainage behavior, which helps you gauge how much pressure to expect when you reconnect.
Protect your workspace with towels or a shallow tray to catch residual water. Have a bucket handy for larger spills, and wear gloves to shield your hands from sharp edges or hot surfaces. If your kitchen layout requires it, gently pull the dishwasher away from the wall to access hoses and clamps more easily. A flashlight or phone light improves visibility around the hose elbows and clamps. According to Unclog Drain, following these safety steps reduces the risk of damage and makes the procedure smoother, especially for first-time DIYers.
Tools and materials you’ll need
Before you begin, assemble the tools and materials to minimize interruptions. A clean, flat workspace helps you stay organized and reduces the chance of dropping parts. You’ll typically need a bucket, towels, screwdrivers, pliers, a flashlight, a flexible brush, and optional replacement hoses or clamps. Keeping a small tray for screws and hose clamps prevents losing small parts inside the cabinet. If you discover a damaged hose, replace it rather than attempting a temporary fix. A tidy workspace with the right tools speeds up the process and reduces the risk of mistakes.
Step-by-step overview of the unclogging process
The goal is to remove the blockage, restore free flow, and verify there are no leaks after reassembly. Start by safely detaching the hose from both the dishwasher and the drain connection, then carefully remove the obstruction with hands or a flexible tool. Rinse the hose with water to ensure the flow is clear, and inspect for cracks or kinks that may require replacement. Finally, reattach the hose securely, turn the water and power back on, and run a short cycle to confirm normal operation. If the flow remains restricted, the issue may lie further along the drain path, such as the sink trap or disposal, and may require additional checks.
From a practical standpoint, the most common errors are overtightening clamps, crushing the hose in a tight cabinet corner, or missing a small bend in the hose where debris collects. By methodically following the steps and testing at the end, you can determine whether the hose is truly clear or needs replacement.
Prevention and maintenance tips
To minimize future clogs, implement a lightweight maintenance routine. Regularly inspect the hose for signs of wear, cracks, or stiffness and replace it if you notice damage. Use a mesh filter in the dishwasher’s drain inlet if your model supports it, and avoid placing large food scraps down the disposal or directly into the dishwasher that can accumulate in the hose. After each cycle, check the area under the sink for damp spots or puddles which indicate a slow leak. Consider scheduling a quarterly check if your household runs high-volume loads or cooks often with starchy foods. Keeping the hose free of sharp bends can dramatically reduce the chance of future blockages.
Troubleshooting common issues after reassembly
If you detect a leak after reconnecting the hose, inspect the hose clamps and make sure the hose is seated fully with a clean mating surface. Replace worn clamps and ensure the hose is not kinked during reinstallation. If water still backs up after a cycle, trace the path from the dishwasher to the sink, checking each connection and the trap for blockages. In some cases, buildup in the sink drain or garbage disposal can force water back through the dishwasher hose; clearing those drains can resolve the issue. If you notice a persistent odor, flush the line again and verify there is no residue trapped in a bend or elbow. Finally, if you cannot clear the hose using manual methods, it may be time to replace the hose or consult a professional.
Summary of what you’ll accomplish with this guide
By understanding the common causes of clogging and carefully following the steps outlined here, you can restore proper drainage without expensive service calls. Regular inspection and mindful use of the dishwasher drain hose reduce future problems and extend the life of your appliance. As you gain experience, this process becomes quicker and safer, and you’ll feel more confident handling small repairs around the home.
Tools & Materials
- Bucket or shallow tray(Catches water and debris during hose removal)
- Old towels or rags(Protect floor and absorb spills)
- Screwdrivers (Phillips and flat-head)(Loosen hose clamps and disconnect fittings)
- Pliers or channel-lock pliers(Grasp and remove clamps without crushing hose)
- Flashlight(Improve visibility around elbows and connections)
- Flexible brush or old toothbrush(Gently scrub the inside of the hose)
- Replacement hose clamp or new hose(Use if the existing clamp is damaged or the hose shows wear)
- Replacement dishwasher drain hose (optional)(Have on hand if the hose is cracked or degraded)
Steps
Estimated time: 30-60 minutes
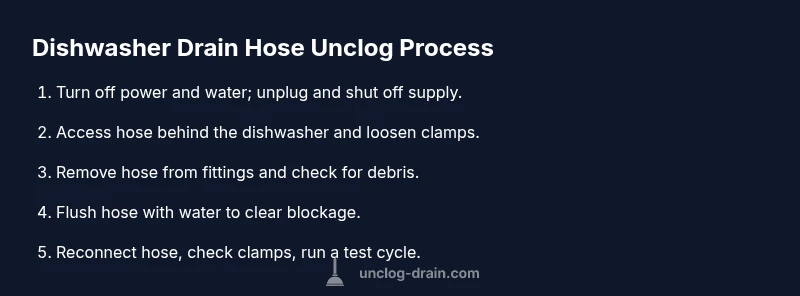
- 1
Disconnect power and water
Unplug the dishwasher or switch off the circuit breaker. If the unit is connected to a hot water line, shut off the supply valve. This protects you from shocks and burns while you work.
Tip: Always double-check the circuit and water supply are off before touching any electrical or plumbing parts. - 2
Access the drain hose and clamps
Move the dishwasher away from the wall to expose the back. Locate the drain hose where it exits the dishwasher and where it connects to the sink drain or disposer. Inspect clamps and remove any screws or bands holding the hose in place.
Tip: Take a photo of the routing before disconnecting so you can reinstall correctly. - 3
Disconnect the hose from the dishwasher and drain
Loosen the clamp at the dishwasher end and carefully slide the hose off the fitting. Repeat at the sink/disposer end. Have a bucket ready for residual water.
Tip: Work slowly to avoid tearing the hose or disconnecting other components unintentionally. - 4
Remove the clog from the hose
Gently push or pull the hose to feel for a blockage. Use the flexible brush to dislodge any debris without forcing material deeper into the line. If the hose is severely kinked or blocked, consider replacing it.
Tip: Don’t use sharp tools that could puncture or damage the hose. - 5
Flush the hose and inspect
Run water through the hose, either by holding it under a faucet or using a garden hose to push debris out. Check for a clear flow and visually inspect the interior for remaining obstructions or signs of wear.
Tip: If water still backs up, try a brief reverse flush from the end connected to the sink to help clear residual debris. - 6
Reconnect and test
Reattach the hose to both fittings and tighten clamps securely. Restore power and water, then run a short wash cycle to verify proper drainage and check for leaks.
Tip: Watch for drips at every connection during the first minute of operation.
Common Questions
What causes dishwasher drain hoses to clog?
Food particles, grease, and mineral buildup accumulate in the hose over time. Kinks and routing issues also trap debris. Regular inspections help catch these early.
Food and grease build up in the hose over time, and kinks can trap debris. Regular checks help prevent clogs.
Can I use chemical drain cleaners on the dishwasher hose?
No. Chemical drain cleaners can damage the hose and seals. Mechanical cleaning with a brush and flushing is safer and effective.
Avoid chemical cleaners; use mechanical cleaning and flushing instead.
Do I need to disconnect power to unclog the hose?
Yes. Always unplug the dishwasher or switch off the circuit breaker before starting. This prevents shocks and avoids accidental activation.
Yes—unplug or switch off the breaker before starting.
How often should I inspect the dishwasher drain hose?
Inspect at least every 6-12 months, looking for cracks, hard spots, or kinks. Replace damaged hoses promptly.
Inspect every 6 to 12 months and replace damaged hoses promptly.
What if water leaks after reattaching the hose?
Check that clamps are tight and hoses seated fully. Inspect for cracks and verify no sharp bends exist. Re-test after tightening.
If it leaks, recheck clamps and seating, then test again.
If I can’t clear the hose, what should I do?
If mechanical cleaning fails, replace the hose or consult a professional. Leaks or repeated clogs may indicate a larger drain issue.
If cleaning fails, replace the hose or seek professional help.
Watch Video
Key Points
- Disconnect power and water before starting
- Inspect the entire drain path, not just the hose
- Use mechanical cleaning methods; avoid chemicals
- Test the system and look for leaks after reassembly