How to Fix a Clogged Drain: DIY Guide
A practical, step-by-step guide to fix a clogged drain safely without harsh chemicals. Learn plunging, snaking, and prevention tips for kitchen and bathroom drains.

By the end of this guide, you will fix a clogged drain yourself using safe, proven methods. You’ll learn when to plunge, when to snake, and how to prevent future blockages. With the right technique, kitchen and bathroom drains can often be cleared without hiring a plumber or using harsh chemicals. Prepare with basic tools, follow the steps in order, and assess whether more steps or professional help is needed.
What causes clogs and when to act
If you're wondering how to fix a clogged drain, the first step is understanding the typical culprits. Most residential clogs come from hair, soap scum, grease, and food particles that accumulate over time. In kitchens, fat and oil often cling to the pipe walls, while in bathrooms hair and soap residue trap debris. Clogs rarely form overnight; they build up gradually, especially in long, idle piping runs. Early signs include slow drainage, gurgling sounds, bad odors, or water backing up into sinks, showers, or tubs. Addressing these signs early saves time, money, and mess. According to Unclog Drain, addressing the issue early with simple, safe techniques can prevent minor blockages from turning into stubborn jams. If you’re unsure where the clog sits, start at the nearest fixture and work outward. Remember: the goal is to restore flow with minimal disruption and no damage to pipes. This guide focuses on practical methods you can perform with common tools, avoiding harsh chemicals whenever possible.
Essential tools and safety considerations
Before you begin, gather a few simple tools and follow safety precautions. You’ll want a plunger (cup or flange), a drain snake or auger, a bucket, and rubber gloves. A flashlight helps you see what’s happening in the drain. Keep old towels ready for spills and a few rags for cleaning. If you’re unclogging a toilet, a flange plunger is essential for a proper seal. For kitchen or bathroom sinks, a cup plunger may suffice. Safety first: avoid mixing chemicals, never force a tool into a drain, and always turn off the water supply if you suspect a leak. If you have PVC pipes, be gentle with pressure to avoid cracks. This section sets you up for success, reducing splash risk and making the next steps smoother. A calm, methodical approach minimizes mess and protects your plumbing.
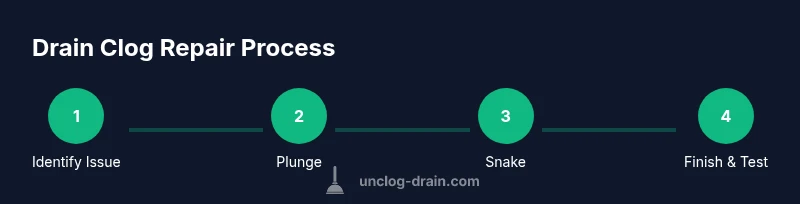
Step-by-step overview: choose the right method first
Most clogs respond to the simplest method first. Start with plunging to clear blockages near the drain opening, then move to a drain snake if plunging doesn’t fully restore flow. If multiple fixtures are affected, the problem may be deeper in the plumbing system, and you’ll need a more thorough approach or professional help. The goal is to restore continuous flow with the least invasive method. As you work, keep the area clean and dry, and test the drain after each major step. This overview helps you decide the order of operations, saving time and avoiding unnecessary disassembly. In many homes, a well-executed plunge followed by a careful snake is enough to clear most blockages.
How to plunge effectively (kitchen or bathroom sinks)
Plunging is often the quickest path to relief. Position the plunger so the cup fully covers the drain and create a tight seal. With firm, quick pushes and pulls, maintain continuous pressure for 15-30 seconds, then pause to check drainage. If water begins to move, repeat the process in short bursts until the water drains smoothly. Pro tip: avoid using a plunger with metal parts that may corrode; instead, choose a durable, plastic-handled model. Safety note: ensure you have a bucket nearby to catch splashes and protect the floor with towels. If the blockage remains after 3-5 rounds of plunging, switch to a snake or contact a professional.
How to use a drain snake or auger for stubborn clogs
A drain snake can reach clogs that are beyond the plunger's reach. Insert the coil into the drain and twist the handle to advance it while applying gentle pressure. When you feel resistance, rotate to break up the clog, then pull out slowly, bringing debris with it. Rinse the snake and reinsert if needed. Important: avoid forcing the snake through a curved pipe or a trap that could kink; keep the motion steady and controlled. For toilets, use a toilet auger designed for that fixture; never force a regular snake into a toilet bowl. After the obstruction clears, flush with hot water to push remnants through the system. If the water still won’t drain after several attempts, move to a professional option.
Safe, chemical-free alternatives and when to avoid chemicals
Chemicals such as drain cleaners may remove some clogs, but they can damage pipes, septic systems, and aging seals. Whenever possible, rely on mechanical methods rather than chemical solutions. Natural alternatives like baking soda and hot water can help with minor buildup, but avoid mixing these with acidic cleaners. A simple combination of baking soda and hot water can be poured into the drain and left for a few minutes before flushing with hot water. Remember: never mix cleaners, and never use these products in a toilet or on metal pipes without checking compatibility. If you suspect a more serious issue, such as a broken pipe or a seized trap, halt DIY efforts and seek professional help. This approach prioritizes safety and long-term pipe health while reducing environmental impact. Unclog Drain analysis shows that routine maintenance significantly reduces clog frequency over time.
Prevention and maintenance to avoid future clogs
Once you’ve cleared the drain, focus on prevention. Regularly remove hair from bathroom drains, use sink strainers in kitchens, and avoid pouring grease or oil down the drain. Run hot water for 15-30 seconds after use to keep soap and grease from solidifying along the walls. Schedule a monthly or quarterly quick check to inspect the P-trap under sinks and bathrooms, ensuring there are no leaks or standing water. The Unclog Drain team emphasizes routine maintenance as the best defense against clogs. If you notice slow draining or gurgling, address it early before it becomes a bigger issue. Lastly, consider minor upgrades like mesh strainers and more robust pipes in areas with high clog risk. Together, these steps form a reliable, DIY-friendly plan that keeps your drains flowing smoothly. The Unclog Drain team recommends adopting this maintenance mindset to keep drains clear.
Tools & Materials
- Plunger (cup or flange)(For sinks or toilets depending on type)
- Drain snake / auger(At least 3-4 ft length; choose a model suited for your fixture)
- Bucket(To catch water and debris)
- Rubber gloves(Waterproof and comfortable; protect your hands)
- Old towels or rags(Protect surfaces from spills)
- Flashlight(Helps observe the drain area clearly)
- Mesh drain cover/strainers(Keeps debris out after clearing the drain)
Steps
Estimated time: 45-75 minutes
- 1
Assess blockage safely
Inspect visible parts of the drain and listen for noises indicating a deep clog. Check for multiple fixtures draining slowly to gauge the blockage depth. If you smell sewer gas or notice a leak, stop and ventilate the area before continuing.
Tip: Shut off water to the affected fixture if you suspect a leak; wear gloves and use protection for eyes. - 2
Gather tools and prep the area
Lay towels, place a bucket under the trap, and assemble your plunger and snake. Clear the area of valuables and wipe spills as you go. Test the drain’s current flow to establish a baseline.
Tip: Keep a clear workspace and avoid mixing tools meant for toilets with those for sinks. - 3
Plunge the drain
Seal the drain with the plunger and push-pull in steady, forceful motions for 15-30 seconds. Release and observe drainage. Repeat 3-5 times or until water begins to clear.
Tip: Use a flange-plunger for toilets; ensure an airtight seal before each push. - 4
Use a drain snake if needed
Insert the snake into the drain while rotating gently. When you feel resistance, push a bit further, then retract slowly to pull out debris. Repeat as needed.
Tip: Do not force through sharp bends; withdraw and straighten if resistance feels excessive. - 5
Flush and test the drain
Run hot water (or warm water if you have plastic pipes) for 1-2 minutes to flush loose material. Re-test the drain by running water; ensure steady flow with no backups.
Tip: If the drain slows again, repeat the steps or proceed to professional help. - 6
Decide on next steps or call a pro
If you can’t clear the clog after several attempts, the blockage may be more than a DIY fix can handle. Consider scheduling professional service or inspecting deeper plumbing yourself if you have the right tools.
Tip: Document symptoms (slowness, odors) to explain the issue when you contact a pro.
Common Questions
What is the most effective method for a clogged drain?
For many households, plunging first is the most effective. If that fails, try a drain snake to reach deeper clogs. Persist with mechanical methods before considering professional help.
Start with plunging, then move to a snake if needed. If the clog remains, consider calling a professional.
Are chemical drain cleaners safe to use?
Chemical cleaners can damage pipes and septic systems and may cause harm if misused. Rely on mechanical methods when possible and avoid mixing products.
Chemicals can harm pipes; use mechanical methods first and only use cleaners if absolutely sure they're safe for your setup.
Can a plunger damage pipes?
A properly used plunger generally won’t damage pipes. Avoid excessive force and choose the right plunger type for toilets vs. sinks.
When used correctly, plungers are safe; don’t apply excessive force.
How long should I keep DIY methods before calling a pro?
If after 30-45 minutes of persistent effort there’s no improvement, it’s reasonable to call a professional to assess deeper plumbing issues.
If it doesn’t improve after 30-45 minutes, call a pro.
Is boiling water safe for all pipes?
Boiling water can help with some kitchen clogs but should be avoided on PVC pipes or older plumbing where sudden temperature changes may cause damage.
Boiling water can help some choices, but be careful with certain pipe materials.
What maintenance helps prevent future clogs?
Use strainers, avoid pouring grease, and run hot water after dishwashing or cooking to minimize buildup. Regular checks of P-traps also help.
Use strainers and avoid grease; run hot water after use to prevent buildup.
Key Points
- Identify clog causes before choosing a method
- Begin with plunging, escalate to snaking if needed
- Avoid chemical cleaners for safety and pipe health
- Maintain regular drain maintenance to prevent future clogs