Kitchen Sink Blockage Removal: A Practical DIY Guide
Learn safe, effective kitchen sink blockage removal techniques using common tools like plungers and drain snakes. This step-by-step guide covers safety, prevention, and when to call a pro for lasting results.

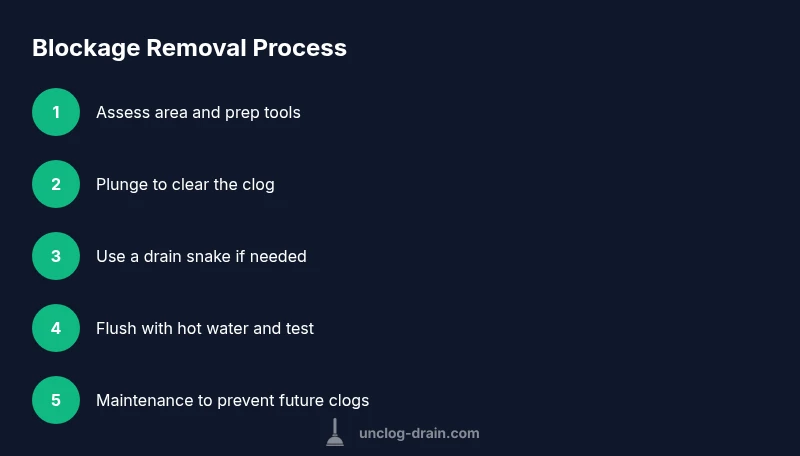
You will learn how to safely remove a kitchen sink blockage using common tools (plunger, drain snake, hot water) and proven techniques. Start with plunging, then move to mechanical snaking, and finish with a hot-water flush. Gather tools, protect the area, and shut the under-sink supply if you need to. This guide keeps mess contained and safe.
What is kitchen sink blockage removal and why it matters
According to Unclog Drain, kitchen sink blockage removal is about restoring drainage while preventing pipe damage and mess. A blocked sink disrupts daily routines, invites foul odors, and can escalate into bigger plumbing problems if the clog is not addressed promptly. The core idea is to reestablish a clear channel for greywater and food waste to travel from the sink toward the drain pipes. In many homes, the sink trap (P-trap) holds a reserve of standing water that helps prevent sewer gases from entering the living space; a blockage above or within the trap interrupts this balance. By understanding the typical culprits—grease, food scraps, soap scum, coffee grounds, and hair—you can select safer, less invasive methods first. Kitchen sink blockage removal isn’t just about clearing the clog; it’s about protecting your plumbing, reducing future clogs, and keeping your kitchen hygienic. Unclog Drain’s guidance emphasizes a measured approach that prioritizes safety and containment, especially if you share the sink with a garbage disposal or have older pipes that may be more fragile. As you proceed, you’ll balance mechanical methods with preventive habits to minimize recurring issues.
Common causes and how they form
Most kitchen sink blockages form when solid waste accumulates in the drain line. Fats and oils congeal on pipe walls, forming grease jams that trap food particles. Food scraps from meal prep or leftovers can settle and compact, narrowing the passage over time. Soap residue and mineral buildup contribute to a slick film that binds debris. In a disposal-equipped sink, tiny food bits can slip into the trap and cause slow drainage or complete blockage. The result is a sluggish sink that bubbles, backs up, or drains irregularly. Recognizing the typical culprits helps you tailor your recovery approach. The Unclog Drain team notes that prevention—such as scraping plates, running hot water after use, and occasional enzyme-based cleaners—can significantly reduce clog frequency. If you notice gurgling, foul odors, or water backing up into other fixtures, treat it as a signal to intervene sooner rather than later. A proactive plan keeps your plumbing healthier and your kitchen running smoothly.
Tools and safety you should have on hand
Before you begin kitchen sink blockage removal, assemble a basic tools kit and set safety expectations. A good plunger with a flange is more effective on flat sink drains than a cup plunger. A manually operated drain snake or auger helps when plunging fails to dislodge the clog. Keep a bucket, old towels, and rags for catching drips, plus gloves and eye protection to guard against splash. If you have a double-basin sink, plan to seal the other basin to maximize suction. A kettle or pot of hot water, along with baking soda or a bit of dish soap, can assist with the flush and loosening action. Avoid mixing chemical cleaners with other methods, which can create dangerous fumes or pipe damage. Always consider the material of your pipes (PVC, copper, cast iron) and use heat cautiously to prevent warping. A calm, methodical setup reduces spillovers and keeps the project clean and manageable.
Step-by-step plunging technique
Plunging is the most accessible first step for many kitchen sink blockages. Start by filling the sink with enough water to cover the plunger bell. If you have a double sink, block the other basin with a rag to improve suction. Place the plunger over the drain and ensure a tight seal. Use firm, up-and-down motions without lifting the plunger off the drain. Continue for 15–30 seconds, then lift to see if pressurized water clears the clog. If the water drains slowly or remains still, repeat a few more cycles. The goal is to create enough force to loosen the clog or break the seal of any trapped air. After successful plunging, run hot water to clear remaining debris and test the drain by filling the sink again and letting it drain. Pro tip: if the water backs up, pause and reassess—sometimes the clog is more substantial and requires a different method.
When plunging doesn't work: using a drain snake or auger
If plunging fails to clear the clog, a drain snake (auger) is often the next best option. Insert the snake into the drain until you feel resistance, then rotate the handle to break up the blockage and latch onto debris. Push gently and avoid forcing the snake if you meet resistance; forcing can push the clog deeper or damage pipes. As you retract the snake, slowly pull out any gunk and wipe it away. For disposals, avoid metal shavings and hard objects that could nick the grinding surface. After using the snake, run hot water to help wash away loosened material. If you still observe slow drainage, consider a second approach or repeating the snake process from a different angle. The key is patience and steady technique to minimize damage while maximizing clog clearance.
Chemical cleaners: do they help or harm?
Chemical drain cleaners may seem convenient, but they come with safety and pipe-damage concerns, especially in older homes. Many experts discourage regular use of caustic or acidic cleaners in kitchen drains, as they can corrode pipes or harm disposals. Safer alternatives include baking soda and vinegar or simply hot water to emulsify grease and push debris through. If you choose to use a cleaner, read the label carefully and never mix products. Always ventilate the area and wear gloves. In most cases, mechanical methods (plunging and snaking) paired with a hot-water flush achieve results without chemical exposure. The Unclog Drain team reinforces this stance, noting that repeated chemical use can lead to wear and hidden damage over time. When evaluating options, prioritize methods that maintain pipe integrity and user safety.
Finishing touches: hot water flush and test
After mechanical clearance, a thorough hot-water flush helps remove residual grease and soap scum. Boil water or use very hot tap water (careful with PVC). Slowly pour the water directly into the drain while running the faucet to gauge drainage speed. If you notice slow refilling or irregular drainage, repeat a short, controlled flush and then re-test. This stage also provides a quick sanity check: the water should flow smoothly without backflow or gurgling. If you see improvements immediately, keep monitoring for a few more minutes to ensure the clog has fully cleared. Regular maintenance—like using hot water after meals and avoiding pouring fats down the drain—will reduce future blockages.
Maintenance tips to prevent future clogs
Preventive practices save time and money. Minimize food scraps entering the disposal, wipe plates before rinsing, and run plenty of hot water after cooking. Consider installing a mesh strainer to capture debris. Periodic enzyme-based cleaners can help break down organic matter in the pipe over time, especially in households with hard water or mineral buildup. If you have a garbage disposal, avoid putting fibrous vegetables, coffee grounds, or rice into it, which can lead to clogs. Schedule a monthly rinse with hot water and a pinch of baking soda to maintain the line’s cleanliness. Regular inspection of the P-trap under the sink for leaks and cleanouts ensures you catch issues early before they become major problems. Unclog Drain’s philosophy emphasizes consistency in maintenance as the best defense against stubborn clogs.
Common mistakes to avoid
Avoid mixing multiple chemical cleaners, which can release dangerous fumes. Do not use a metal object to poke inside the drain, as this can damage the piping or push the clog further in. Don’t force the snake or plunger if you meet resistance; applying extra force can bend the tool or harm the pipe. Skipping protective gear or not securing the other basin can result in messy spills. Finally, never ignore warning signs like persistent odors, water backup in multiple fixtures, or a rising drain level after steps. Taking small, deliberate actions with the right tools reduces risk and improves your odds of success.
When to call a professional
If water remains blocked after attempting plunging and snaking, or if you notice repeated clogs, you should call a licensed plumber. Persistent blockages may indicate deeper issues such as a sewer line problem, a collapsed pipe, or a venting issue that requires specialized equipment and expertise. Early professional intervention can prevent more extensive, costly damage. In some homes, a professional assessment can identify problems with old piping materials such as cast iron that may be more prone to collapse. The Unclog Drain team reminds homeowners that knowing when to seek help protects both safety and property and can prevent minor issues from turning into major repairs.
Safety basics recap
Always prioritize personal safety and pipe integrity. Wear gloves and eye protection; work in a well-ventilated area. Keep children and pets away from the work zone, especially when hot water or chemical cleaners are involved. Treat your plumbing system gently: avoid hot water on old PVC if it’s near the limit of its heat tolerance. Finally, plan for cleanup and consider replacing worn washers or seals to prevent future leaks.
Final quick check and wrap-up
After you’ve cleared the clog, ensure the sink drains freely by running water for several minutes. Listen for unusual noises that might indicate a hidden blockage or airlock. Document any ongoing issues and consider routine maintenance with a simple cleaning schedule. This disciplined approach keeps kitchen drainage flowing smoothly and reduces the likelihood of recurring problems.
Key takeaway
Kitchen sink blockage removal is usually achievable with common tools and a systematic approach. Start with plunging, move to a drain snake if needed, and finish with a hot-water flush. Prioritize safety and containment, and maintain simple prevention habits to minimize future clogs. If the problem persists, don’t hesitate to seek professional help.
Tools & Materials
- Flange plunger for sinks(Better seal on flat drain surfaces; use a plunger with a rubber flange for a strong seal)
- Drain snake / auger(Manual or cordless mini-reamers are fine; 3–6 ft reach is typical for kitchen drains)
- Rubber gloves(Protect hands from grime and hot water)
- Safety glasses(Optional but recommended to protect eyes from splashes)
- Bucket(Catch drips and hold removed debris)
- Old towels or rags(Contain spills and protect surfaces)
- Dish soap (optional)(Aids in loosening grease when flushing)
- Baking soda(Can help loosen grease when combined with hot water)
- Vinegar (optional)(Used with baking soda for a fizzing action; avoid with disposal adhesives)
- Kettle or pot for hot water(Boiled or near-boiling water; use with caution for PVC pipes)
Steps
Estimated time: 30-45 minutes
- 1
Prepare area and safety
Move items from the sink area, lay towels, and place a bucket under the drain to catch water. Put on gloves and safety glasses if available. Clear the surrounding counter to avoid cross-mess and ensure you have a clear path for cleanup.
Tip: Having a dedicated cleanup zone minimizes spills and keeps tools organized. - 2
Seal the other basin (if double sink)
If you have a dual-basin setup, seal the inactive basin with a damp cloth or rag to maximize suction from plunging. This helps create a stronger seal around the drain and improves effectiveness.
Tip: A good seal makes plunging far more effective, especially on horizontal drains. - 3
Fill with water to prepare for plunging
Fill the sink with enough water to cover the plunger bell. This creates buoyant pressure and better suction during plunging. If water is already low, add hot water from a kettle but avoid scalding temperatures near electrical outlets.
Tip: Adequate water depth improves suction and reduces air gaps. - 4
Position plunger and establish seal
Place the plunger over the drain; ensure a tight seal around the rim and don’t let air escape. Align the handle straight to apply even pressure and avoid bending the drain components.
Tip: A stable seal is essential for effective suction. - 5
Plunge with controlled strokes
Push and pull with firm, vertical strokes for 15–30 seconds. Avoid harsh twisting. Lift the plunger to check drainage and repeat cycles if necessary. The goal is to loosen the clog enough for water to drain.
Tip: Keep motion steady and don’t rush; multiple short cycles are usually better than a single long push. - 6
Evaluate whether to switch to a snake
If plunging doesn’t clear the clog after several cycles, prepare the drain snake. Feed it gently into the drain while turning the handle to break up the blockage.
Tip: Do not force the snake; resistance can indicate a deeper or harder clog. - 7
Use the drain snake to break up the clog
Rotate the snake as you push forward. When you feel resistance lessen, retract the snake slowly to bring debris out. Collect any gunk in the bucket.
Tip: Wipe the snake clean between uses to avoid spreading debris back into the drain. - 8
Flush with hot water and optional cleaners
With the clog loosened, pour hot water down the drain to flush out remaining material. Optionally, add a little baking soda followed by boiling water or a small amount of dish soap for additional grease removal.
Tip: Take care with boiling water if you have PVC pipes to avoid warping. - 9
Test drainage and observe for leaks
Run the faucet and observe the drainage. If water drains quickly and cleanly, you’ve likely cleared the clog. If slow drainage returns, repeat steps or proceed to professional help if needed.
Tip: A successful test after one or two cycles is a good sign; persistent slow drainage indicates deeper issues. - 10
Cleanup and maintenance plan
Wipe down surfaces, dry the area, and store tools. Consider routine maintenance, like a monthly hot-water flush and a periodic enzyme cleaner to keep lines clear over time.
Tip: Establish a simple weekly habit to prevent future clogs and extend pipe life.
Common Questions
Can I use chemical drain cleaners for kitchen sink blockages?
Chemical drain cleaners can damage pipes or disposals, especially with repeated use. They sometimes create hazardous fumes when mixed with other cleaners. Mechanical methods—plunging and snaking—are typically safer and effective first-line options.
Chemical cleaners can damage pipes and dispose systems; start with plunging or snaking for a safer approach.
Will plunging harm my pipes?
When done correctly, plunging is safe for most residential pipes. Use the correct plunger type and avoid forcing the tool. If you hear crashing noises or see leaks, stop and reassess or call a professional.
Plunging is usually safe if done properly; stop if you hear leaks or feel resistance you can't overcome.
What if I have a double kitchen sink?
Double sinks can complicate suction. Block the unused basin and maintain a tight seal on the active drain. If water backs up into the other basin, you may need to snake or check the shared trap.
Block the unused basin and ensure a good seal; if issues persist, inspect the shared trap.
Is a drain snake risky for beginners?
A drain snake is generally safe when used slowly with steady pressure. Avoid forcing it through tight bends and stop if you encounter strong resistance. Clean the tool after use to prevent spreading debris.
Snakes are safe for beginners if you use slow, steady pressure and don’t force through bends.
How long should I wait after a baking soda and vinegar flush?
Baking soda and vinegar can help loosen organic buildup; give it a few minutes before flushing with hot water. If you don’t see improvement, rely on mechanical methods instead.
Give it a few minutes, then flush with hot water; if no improvement, switch methods.
When is it time to call a professional?
If clogs persist after plunging and snaking, or if you notice recurring backups in multiple fixtures, a licensed plumber should assess for deeper issues like sewer line problems or vent blockages.
If the clog remains after DIY attempts, call a professional for a thorough inspection.
Watch Video
Key Points
- Prepare area and safety gear before starting.
- Start with plunging; progress to a snake if needed.
- Avoid harsh chemicals; mechanical methods are safer and effective.
- Finish with hot water flush and verify drainage.
- Prevent clogs with routine maintenance and mindful disposal.