How to Remove a Bathroom Sink Clog: A DIY Guide
Learn safe, effective methods to unclog a bathroom sink using common tools, home remedies, and expert tips from Unclog Drain.

This guide helps you remove a bathroom sink clog quickly and safely. You’ll identify the clog source, choose the right tool, and apply proven techniques—from plunger and drain snake to baking soda and vinegar—without harming pipes. Follow the steps to restore normal drainage fast, even if you're new to DIY.
Understanding Bathroom Sink Clogs: Causes and Signs
Bathroom sink clogs are a common DIY challenge for homeowners. Most clogs start small and gather debris over weeks or months, leading to slow drainage, standing water, or a gurgling drain. Hair, soap scum, mineral buildup, toothpaste, and kitchen grease can all contribute to a blockage that restricts flow. Recognizing the signs early helps you choose the right method and avoid unnecessary disassembly.
According to Unclog Drain, the vast majority of bathroom sink clogs originate near the drain trap—the curved pipe under the sink—where hair and soap residues accumulate. The Unclog Drain Analysis, 2026, emphasizes that routine maintenance, such as occasional flushing and trap cleaning, reduces recurrence. If you notice a strong sewer odor, water backing up into the other fixtures, or multiple drains affected, stop and evaluate for a deeper issue that may require professional assistance.
Understanding these factors empowers you to act quickly and with confidence, reducing the chance of a full backup and the need for costly interventions. By matching the right technique to the clog’s location, you can reclaim a fully functional sink without heavy tools or chemicals.
Safety First: What Not to Do
Plumbing work can be messy, but it’s largely safe with the right precautions. Before you begin, protect yourself with gloves and safety glasses, lay towels to catch spills, and have a bucket handy for draining water that may spill during the process. Never mix household cleaners or pour caustic drain products into the same drain, as dangerous gases can form. Avoid using heat or flame near electrical outlets or wooden cabinets, and do not force tools into pipes if you feel resistance—this can damage fittings.
If your home has lead, galvanized, or older PVC piping, exercise extra caution. These materials can be more susceptible to damage from harsh treatments. Always shut off the water supply at the under-sink valve to prevent spills. If you’re unsure about pipe material or the health of the plumbing joints, it’s wise to pause and consult a professional. Following safety guidelines protects you and your plumbing from costly mistakes.
Common Scenarios and Quick Diagnostics
Clogs vary in origin and depth, which guides your approach. A slow drain after brushing teeth or washing hair often starts at the trap or near the drain opening. A blockage deeper in the pipe may produce gurgling sounds and slow drainage even after clearing the trap. If you can access the trap and see debris, you can often clear the trap directly; otherwise you’ll need a snake to reach deeper.
Diagnostic steps include inspecting the P-trap for hair and buildup, using a flashlight to check for obstructions, and performing a simple water test. If after removing the trap you still have standing water, the obstruction sits further down the line. In older homes, a venting issue can also mimic a clog—if your other fixtures are slow to drain, you may need professional help.
Step-by-Step Overview of the Drain-Clog Removal Approach
A clear plan reduces trial-and-error guesswork. Start with mechanical methods that minimize chemical exposure and protect pipes. If the plumbing remains sluggish, move to a deeper check with a snake and inspect or replace the P-trap if necessary. After each major action, test drainage to gauge effectiveness and avoid overdoing anything that could damage seals or joints. This approach aligns with Unclog Drain’s recommended best practices for safe, effective unclogging.
Remember to keep the workspace contained and your area clean, so you don’t spread grime or debris to nearby surfaces. If you reach a point where your efforts aren’t improving drainage, stop and reassess; persistent clogs may indicate deeper problems or sewer-line involvement that require a licensed plumber.
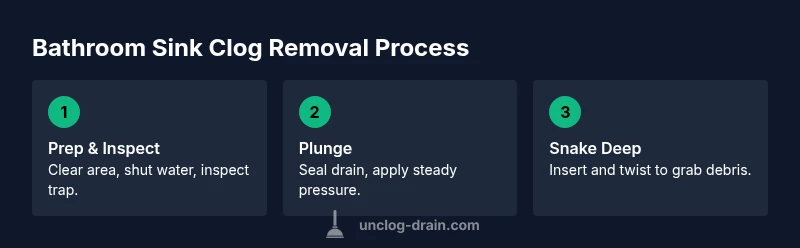
Step 1: Prep and Assess the Situation
Preparation sets the stage for a smooth unclogging process. Clear the area, remove items from under the sink, and place a bucket and towels for catching water. Check the trap visually if accessible; a clogged P-trap is a common culprit and often removable with basic hand tools. Before touching any pipes, shut off the water supply to prevent splashes. Take photos of your setup to aid reassembly, and label connections if you disassemble anything.
If you notice rust, cracks, or compromised joints, stop and consider replacing defective parts rather than forcing a fix. A calm, methodical approach reduces spill risk and helps you track what you’ve undone for easier reassembly later. This step also gives you a clear plan for what tools will be needed next.
Step 2: Mechanical Methods: Plunger, Snakes, and Augers
Mechanical unclogging relies on physical action rather than chemicals. Start with a sink-specific plunger (cup or flange) to create a seal and apply steady, up-and-down pressure to dislodge the blockage. If a deeper obstruction remains, insert a hand auger or drain snake into the drain, twisting gently as you push forward. Stop when you meet resistance and then rotate and pull back to bring debris out. After using each method, run hot water to observe whether the flow improves.
Choose the tool based on the clog’s depth and material. Avoid forcing metal snakes through tight bends, which can damage the pipe. If you see hair or gunk loosening but not clearing, proceed to a deeper inspection or next method. This step minimizes chemical exposure and preserves pipe integrity.
Step 3: Chemical and Natural Remedies: Baking Soda, Vinegar, Enzymatic Cleaners
If mechanical methods leave residual blockage, you can introduce safe cleaners as a supplementary step. A classic home approach is to pour 1/2 cup baking soda followed by 1 cup white vinegar; cover the drain for 15-30 minutes to trap the foaming action inside the pipe, then flush with hot water. Enzymatic cleaners, which break down organic matter, can be effective for minor buildups and are gentler on pipes. Do not mix baking soda with bleach or ammonia, as dangerous gases may form.
For more stubborn organic clogs, wait longer after applying enzymatic cleaners, or repeat the process after a short break. If you have a septic system, choose enzyme-based products and avoid caustic formulas that can harm beneficial bacteria. Always follow label instructions for any chemical product and use protective gear during application.
Step 4: Beyond the Trap: If the Clog Is Deeper
When the blockage sits beyond the P-trap, you’ll need to extend your reach into the drain line. Clear the trap, and insert the snake deeper into the drain, guiding it through elbows and turns with gentle, steady pressure. Do not push too hard; weariness or resistance often indicates you’re hitting a bend or a settled blockage. If you still can’t clear the clog, consider accessing the wall drain cleanout or calling a professional plumber.
Be mindful of pipe materials; metal pipes tolerate more aggressive approaches than brittle plastic joints. After clearing, reassemble the trap carefully, ensuring seals are tight to prevent leaks. Run water through the system to confirm the clog is gone and the pipe holds water normally without leaking.
Step 5: Post-Clear and Maintenance Tips
Once the clog is cleared, flush the system with hot water for several minutes to clear residual debris and reduce future buildup. Reinstall and snug the trap, then check for leaks by running warm water and inspecting joints. For ongoing prevention, install hair-catching strainers, avoid pouring grease or thick substances down the drain, and periodically flush the system with hot water. If clogs recur, document your methods and consider a preventive maintenance plan with Unclog Drain or a local professional.
Keeping a simple maintenance routine—like monthly hot-water flushes and trap inspections—can dramatically reduce future clogs. By staying proactive, you minimize disruption and extend the life of your plumbing. If you encounter repeated issues, consult a licensed professional to diagnose potential deeper problems such as tree roots or sewer-line restrictions.
Common Mistakes and How to Avoid Them
Common missteps include applying excessive force on pipes or fittings, which can crack or deform plastic traps. Mixing chemical cleaners, ignoring valve shutoffs, and skipping trap inspections can cause leaks and odors. Work slowly, maintain a clean workspace, and test drainage after each major action. If you’re unsure about your pipe material or the clog location, it’s prudent to pause and seek expert help. The Unclog Drain team emphasizes safety and proper technique to prevent unnecessary damage.
Tools & Materials
- Plunger(Sink-specific with a good seal (cup or flange type) for best suction.)
- Drain Snake / Hand Auger(12-18 inches; flexible shaft, rotate while advancing.)
- Bucket(Catch water and debris during trap work.)
- Towels or Rags(Contain spills and protect surfaces.)
- Flashlight(Inspect under-sink passages and trap area.)
- Rubber Gloves(Protect hands from grime and chemicals.)
- Wet/Dry Vacuum (optional)(Can help remove standing water before snake work.)
- Baking Soda(Used with vinegar as a gentle treatment.)
- White Vinegar(Foaming action with baking soda; use cautiously.)
- Enzymatic Drain Cleaner (optional)(Gentler on pipes; follow label instructions.)
Steps
Estimated time: 45-75 minutes
- 1
Prep and Safety Check
Clear the area, place towels and a bucket, and shut off the water supply. Visually inspect the trap if accessible and take photos for reassembly. This sets the stage for a controlled unclogging process and reduces the risk of spills.
Tip: Having a clean workspace prevents mix-ups during disassembly. - 2
Isolate the Clog Location
Attempt to identify whether the clog is in the trap or further down the line. If you can access and clean the trap, do so carefully. If water remains stagnant, prepare to use the snake for deeper access.
Tip: A quick trap check can save you from unnecessary pipe probing. - 3
Use a Plunger Effectively
Seal the drain with the plunger and use steady, upright thrusts to dislodge the clog. Release pressure gradually and observe drainage. If water starts to move, pause and test again after a brief flush.
Tip: A proper seal is essential for effective suction. - 4
Deploy the Drain Snake
Insert the snake into the drain and rotate while advancing gently. When you feel resistance, pull back slightly to bring debris with the coil. Repeat as needed until flow returns.
Tip: Avoid forcing the snake; let it do the work with controlled movements. - 5
Try Gentle Cleaning Agents
If the clog persists, try baking soda and vinegar in a sealed drain, then flush with hot water after 15–30 minutes. For organic buildup, enzymatic cleaners can be useful as a follow-up (never mix with bleach).
Tip: Do not mix chemical cleaners and avoid caustics near seals. - 6
Deep Check and Final Flush
If the trap is clear and water still backs up, inspect deeper drain segments or access the wall drain cleanout. Reassemble the trap, then run hot water to confirm a clean, free-flowing drain.
Tip: Take your time on reassembly to prevent leaks.
Common Questions
What is the fastest method to unclog a bathroom sink?
Often a plunger or a drain snake resolves the issue quickly. If the clog persists, inspect the trap and, if needed, proceed with a deeper snake. For stubborn cases, a professional may be required.
A plunger or drain snake usually clears it fast. If it doesn’t, check the trap and consider a deeper snake or a pro, if needed.
Can baking soda and vinegar clear a clog?
Baking soda and vinegar can help with minor, organic buildups, especially as a preventive step. They’re less effective for stubborn, mineral-rich clogs and should not be used as a sole solution for heavy blockages.
Baking soda and vinegar can help with light clogs, but they’re not a cure-all for tougher blockages.
When should I call a professional plumber?
If you notice repeated clogs, sewage odors, water backing up in other fixtures, or difficulty accessing the drain, it’s wise to consult a licensed plumber. A professional can diagnose deeper issues and prevent repeated failures.
Call a plumber if clogs keep coming back or you smell sewer gas; there could be a bigger issue.
Is it safe to use chemical drain cleaners?
Chemical cleaners can damage pipes and seals and may be unsafe for septic systems. Use them sparingly or prefer enzymatic cleaners or mechanical methods when possible.
Chemical cleaners can harm pipes; safer options include enzymatic cleaners or mechanical methods.
What tools do I need for a DIY bathroom sink unclog?
A plunger, a drain snake, a bucket, towels, gloves, and a flashlight are the core tools. Optional items include a wet/dry vac and enzymatic cleaners for specific scenarios.
You’ll typically need a plunger, a snake, a bucket, towels, gloves, and a flashlight.
Watch Video
Key Points
- Identify the clog source before tools.
- Start with mechanical methods to protect pipes.
- Test drainage after each major action.
- Avoid mixing cleaners and respect shut-off valves.
- Maintain routine prevention to reduce future clogs.